Ho-ho-ho, the December Edition has arrived!

Season's Greetings!

December has arrived, and with it a flood of food, festivities, friends, family, and fun.  While the stress that often accompanies this time of year is a perennial topic, I'm learning that a simple shift in perspective is the key to embracing and enjoying the season. It is a privilege to experience the holidays!  Any "stress" I attribute to sensory overload; it's sometimes a challenge to absorb all of that love and goodness in such a short time!  And if this year your holiday season includes grief or pain (and I've been there during the "merriest" season of all), please know that you are being remembered with love and prayer!  For each of us, whether this season is very merry or mixed with a bit of melancholy, Love really is the reason for this season.  Remember, you are loved!

Of course, one of the ways I express love is to cook!  This month I'm sharing recipes that are a bit unique, including some with Asian flavors and one with French technique.  Honestly, as much as I appreciate "fancy" food during the holidays, sometimes I long for "regular" food.  Most of my Decembers have consisted of either fancy feasting, Chinese take-out or pizza (because I'm so busy making fancy food)!  So here are my humble suggestions for December foods that are simple and satisfying.

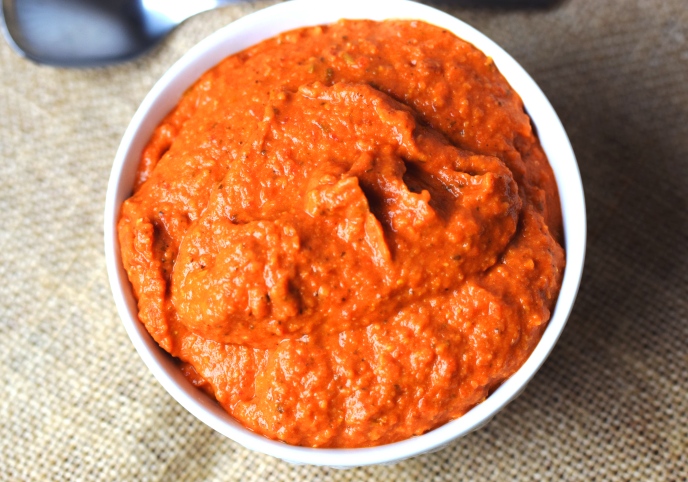
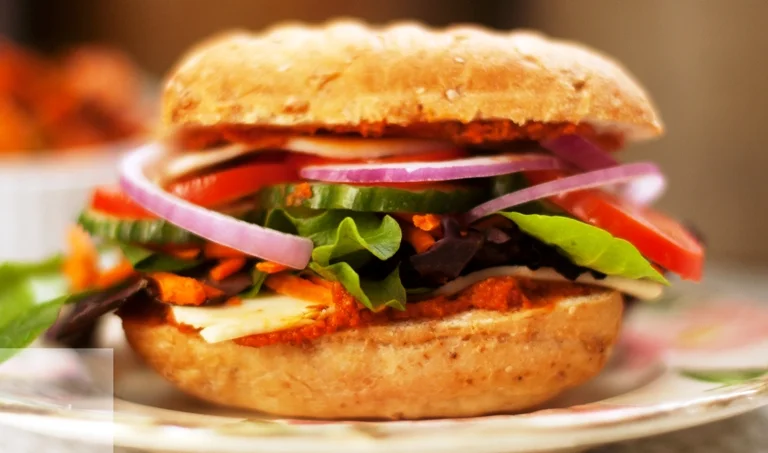
I am sharing a recipe for a rather fancy looking French-inspired breakfast dish, that is really simple to prepare.  "Tarte Tatin" Baked French Toast with Cranberries & Pecans is glorious to behold and utterly delicious.  Made in an iron skillet and turned out onto a platter, your friends and family will be duly impressed!  A cup of soup and a sandwich for lunch is perfect this time of year.  Cecily's Veggie Sandwich was a best-seller at the cafe, with homemade Italian Ciabatta as the foundation, spread with a roasted red pepper & sun-dried tomato hummus (Cecily's Sandwich Spread), and filled with fresh veggies and cheese.  Spicy Thai Chicken Noodle Soup will satisfy your cravings for Thai food and chicken soup!  And a Dark Chocolate & Cherry Eve's Bar is the perfect sweet ending to any lunch, or to sweeten a coffee or tea break

For a comfort food dinner, how about a Chicken & Beef Apple Meatloaf with Chinese Five-Spice Glaze?  Far from mundane; I predict this may become your favorite meatloaf!  Herbed Coconut Jasmine Rice and Crunchy Napa Slaw are absolutely perfect accompaniments, too!  Dessert?  How about a slice of Chocolate Ice Cream Roll drizzled with Chocolate Sauce?  Make a few and keep them in the freezer to serve at a moment's notice!

Remember to check out the Holiday Edition, there are new recipes each week during this season!  You'll find awesome dishes for entertaining or enjoying all by yourself.

There is still time to purchase a gift subscription to Feast of Eden Cooks at Home!  The special price is just $60 for a 12-month subscription.  Just email me at cheflisa@comcast.net to arrange for payment and delivery! 

Believing your holiday will be peaceful and pleasant.  I can't wait to see what 2017 holds for all of us!

Blessings,

Spicy Thai Chicken Noodle Soup

Thai Spicy Chicken Soup with Mushrooms, Bok Choy, and Rice Noodles

Thai Spicy Chicken Soup with Mushrooms, Bok Choy, and Rice Noodles

Craving Thai, but want to stay in?  This soup will satisfy those craving!  It's quick to make, full of flavor and a bit of heat (adjust to suit your personal taste), with the added benefit of healthy veggie and protein.  And, any leftover soup is great poured over leftover Herbed Coconut Jasmine Rice, also in this month's addition!

Equipment needed:  Stock pot    Chef's Knife      Cutting Board

6 cups chicken broth

2 cans light coconut milk

2 Tablespoons coarsely grated fresh ginger root (or 2 teaspoons ginger paste)

1/2 teaspoon dried, ground lemongrass (I use Penzey's)

2 teaspoons chili-garlic sauce

1 teaspoon red curry paste

2 Tablespoons soy sauce

2 Tablespoon fish sauce

2 cups sliced shitake mushrooms, stems removed

3 baby Bok Choy, leaves sliced, white part chopped

5 boneless, skinless chicken thighs, visible fat removed, sliced very thin (partially frozen, prepped chicken is easier to slice.  Thaw and bring to room temperature before adding to the soup)

8 scallions, sliced thin on the diagonal

2 ounces thin rice noodles, cooked according to package directions

3 Tablespoons freshly-squeezed lime juice

1/2 cup roughly chopped fresh cilantro leaves plus whole leaves for garnish

Put the chicken broth, coconut milk, ginger, lemongrass powder, garlic-chili sauce, red curry paste soy sauce, fish sauce, shitakes, and white parts of the Bok Choy into thestockpot and bring to a boil.  Cover, reduce the heat to a simmer, and cook for 20 minutes to blend all of the flavors.

Add the remaining ingredients and raise the heat to medium.  Simmer until the chicken is cooked through, about 7 minutes.

Serve garnished with cilantro leaves.

"Tarte Tatin" Baked French Toast with Cranberries & Pecans

"Tarte Tatin" French Toast with Pecans & Cranberries

"Tarte Tatin" French Toast with Pecans & Cranberries

This is a beautiful, delectable dish for a holiday breakfast or brunch, and is lovely on a buffet table.  The technique is similar to making a French Tarte Tatin, with French toast replacing the pastry.  Apple halves are nestled into hot caramel studded with pecans and dried cranberries, then challah dipped in egg custard is used to fill the skillet that is then baked.  A platter of breakfast meats, a dish of scrambled eggs, coffee, juice, and this gorgeous dish would make any breakfast a celebration!

Equipment needed:  10-inch cast iron skillet

4 extra-large eggs, beaten

1 cup whole milk

1 teaspoon vanilla extract

1/4 teaspoon ground cinnamon

10 ounces challah, or other rich, egg-y bread (I used "Indiana Spuds" bread!)

2 ounces unsalted butter, cut into slices

1 cup brown sugar + more for sprinkling

5 small to medium JonaRed or Honeycrisp apples, peeled, halved and cored

1/4 cup heavy cream

2/3 cup pecan halves

2/3 cup dried cranberries

Preheat oven to 350-degrees.

In a 9 X 13 Inch pan mix together the eggs, milk, vanilla, and cinnamon until very well blended.  Lay the bread slices in the pan to coat and absorb the custard mixture, turning the bread slices to coat both sides.

Place a 10-inch cast iron skillet over medium-low heat.  Add the butter and brown sugar and cook until the sugar is melted and caramelized, about 7-8 minutes. Remove from the heat and gently whisk in the heavy cream.  Evenly sprinkle the pecan halves and cranberries over the caramel.  Gently press the apples halves into the caramel, round side down and flat side up to create a flat surface.  Lay the soaked bread over the apples, arrange so that there are no voids at all, breaking the bread into smaller pieces, if needed.

Sprinkle the top with some brown sugar, then place in the preheated oven on the middle rack.  Bake for 40-45 minutes, until the top is golden and puffy all over. (I place a baking sheet under the skillet to catch any drips.)

Remove from the oven.  Run a table knife all around the side of the skillet, then allow the skillet to sit for 2-3 minutes.  Invert the skillet onto a large plate.  Serve immediately.

Italian Ciabatta

Italian Ciabatta

Italian Ciabatta

We baked these several times a week at the cafe, because it was the perfect roll for so many sandwiches and paninis!  They are easy to make, just make sure to allow 12-20 hours for the "biga" to work before making the dough; it gives the ciabatta so much flavor!   They freeze wonderfully, and since the recipe makes 16, you can make these and wrap and freeze some for later use. You really can't buy ciabatta rolls this good!

Equipment needed:  Kitchen Scale    4 quart covered plastic container     Stand mixer  

Half-sheet pans     Wooden Board    Pizza Cutter

12 1/2 ounces unbleached flour

2 ounces whole wheat flour

16 ounces tepid water

1/4 teaspoon Instant Yeast

21 ounces unbleached flour

1 cup warm water

4 teaspoons salt

1 teaspoon Instant Yeast

Make the biga (sponge) by combining the first four ingredients in a 4-quart plastic container until very well blended.  Cover with a lid (or plastic secured with a rubber band, or a shower cap), and let rest at room temperature for 12 to 20 hours, until the biga is very bubbly.  (I tend to let it go for the whole 20 hours as I think it gives more complexity to the flavor of the finished ciabatta.)

Place the biga along with the remaining ingredients in the bowl of a stand mixer (place the bowl on a kitchen scale.  Weigh each ingredient into the bowl, using the tare key to zero out the scale for each new ingredient).  Stir on low speed (using the dough hook) for about 4 minutes.  Increase the speed to medium and mix for 6 more minutes; the dough will be soft and slightly sticky.  (If it is too soft add a small amount of flour a little at a time.  If it is too dry, add a bit of water, a few dribbles at a time until the desired consistency is achieved.)  Transfer to a greased bowl, turning the dough to grease the top, and let rise for 1 1/2 to 2 1/2 hours, until very puffy.

Flour a wooden board well (or the counter top) and turn the dough out onto the board.  Shape it into an even 12 X 12-inch square.  Cut dough in half, then in quarters in both directions, which will create 16 3-inch squares, with a well-floured pizza cutter. Place them, floured side up, on parchment-lined baking sheets.  (I often use a metal spatula to move them, as they may become misshapen if you use your hands only.)  Cover the rolls and allow to rise in a warm spot for 45-55 minutes, or until very puffy.

While the rolls rise, preheat the oven to 425-degrees.  Place a cast-iron skillet or heavy metal pan in the lower part of the oven.  Place the rolls in the oven, then quickly add 1 cup of hot water to the skillet or pan and quickly close the door.  Bake for 15-18 minutes, rotating pans half-way through the baking time.  Remove when the rolls are light brown and hollow sounding when tapped.

Cool on a wire rack.  Freeze if not using within one day.

Cecily Sandwich Spread or Dip

Cecily Dip & Sandwich Spread

Cecily Dip & Sandwich Spread

This dip/spread is so versatile!  Roasted red peppers and sun-dried tomato pesto adds flavor to sandwiches, veggies, or crackers. I like to have this on hand for all of those things; make a batch today, it keeps for several weeks in the 'fridge.

2 large roasted red pepper (from a jar is fine, or roast and peel it yourself)

3/4 cup purchased sun-dried tomato pesto

1 Tablespoon lemon juice

1 cup good mayonnaise

Combine all in a food processor and process until well-combined and smooth.

Feast of Eden's Cecily Sandwich

Cecily Sandwich

Cecily Sandwich

It was a surprise to me how beloved this vegetarian sandwich became at the cafe!  Our made-from-scratch ciabatta got a schmear of Roasted Red Pepper Hummus and was then layered with the customer's choice of cheeses, and a plethora of raw veggies. (Vegans just left off the cheese!)  One customer stated, "if this is what vegetarian tastes like, I think I could be one!".  Delicious!

For Each Sandwich:

1 Ciabatta Roll

2 slices cheese of your choice

Fresh vegetables: spring greens, red onion, shredded carrot, cucumber, spinach, tomato slices, mushrooms, sprouts, etc.  Use your favorites!

Cecily Dip & Sandwich Spread

Split the ciabatta roll and grill briefly in a panini grill or in a skillet until just slightly browned .  Spread both sides generously with the hummus, then layer on a slice of cheese, veggies, and the second slice of cheese, and put the ciabatta top on to finish.  Serve.

Chicken & Beef Apple Meatloaf with Chinese Five-Spice Glaze

Chinese & Beef Apple Meatloaf with Chinese Five-Spice Glaze

Chinese & Beef Apple Meatloaf with Chinese Five-Spice Glaze

The head of the American Personal Chef Association, Candy Wallace,  shared this recipe during a personal chef conference that I attended many years ago, and it is still a favorite!  Far from "run-of-the-mill", this meatloaf has complex flavors and a kicking glaze made from concentrated apple juice, ketchup, chicken broth, and Chinese 5-Spice powder.  Try this once, and you'll understand why this was so popular with personal chefs and their clients!

Equipment needed:  Half-sheet pan     Instant-read thermometer

Meatloaf:

1 pound each ground chicken and ground beef (or 2# of either meat, if desired)

1 1/2 cups Herb Stuffing Mix (not cubes, I used Pepperidge Farms)

1 cup diced sweet-tart apple, cut into 1/8" dice (brunoise)

3 large eggs

2 teaspoons salt

1 cup finely diced onion

2 Tablespoons prepared horseradish

2 Tablespoons prepared mustard

2 Tablespoons heavy cream

3/4 cup ketchup

Glaze:

1 container frozen apple juice concentrate, thawed

1/2 cup chicken broth

1/2 cup ketchup

1 Tablespoon Chinese 5-Spice Powder

Preheat oven to 350-degrees.  LIne a half-sheet pan with parchment paper.

Combine the glaze ingredients in a medium saucepan and cook over low heat until it becomes syrupy and thickens a bit while making and baking the meatloaf.  Remove from heat once it is syrupy and slightly thickened.

Combine all of the meatloaf ingredients in a very large bowl, mixing well using hands or a wooden spoon, until ingredients are evenly combined.  Place the the meat mixture onto the sheet pan, shaping into an even loaf shape.  Bake for 45 minutes, then drizzle enough glaze over the meatloaf to cover.  Continue baking until the internal temperature of the meatloaf reaches 165-degrees, about 15-30 minutes longer.

Remove from the oven and allow to rest for 10 minutes before serving.  Serve with a stripe of the remaining glaze on each slice.

Herbed Coconut Jasmine Rice

Herbed Coconut Jasmine Rice

Herbed Coconut Jasmine Rice

If you're looking for the perfect side dish for any entree with an Asian flavor profile, look no further!  Toasting the rice in a bit of butter, infusing the rice with the flavor of coconut milk and stock, then finishing the cooked rice with fresh herbs makes this rice far from boring!  The left-over rice is a great addition to leftover Thai Spicy Chicken Soup, morphing both into another tasty dish!

2 Tablespoons unsalted butter

1 1/2 cups Jasmine rice (or Basmati)

1 cup coconut milk (may use light)

1 1/2 cup chicken (or vegetable) broth

1/2 cup water

1 teaspoon kosher salt

1/4 cup thinly-sliced chives or finely-chopped green onion tops

2 Tablespoons fresh thyme leaves, chopped

1/2 cup cilantro leaves, choppedf

Melt the butter in a medium-large saucepan (with lid) over medium heat.  Add the rice and raise the heat to medium-high.  Stir and cook the rice until fragrant, and the grains become translucent around the edges.  Add the coconut milk and broth all at once, and bring to a full boil.  Cover with lid, reduce heat to low, and cook for 18 minutes.  (Rice is done when all of the liquid is absorbed.) 

Remove from the heat, add the herbs and fluff and stir with a fork until the herbs are evenly distributed.  Serve immediately.

Crunchy Napa Slaw

Crunchy Napa Slaw

Crunchy Napa Slaw

I discovered this dish in 2000, while I was living in California.  It was an instant hit with friends and family, and was also sold at the South Bend Farmers Market at my booth there.  I recently decided to replace the mayonnaise in the recipe with whole coconut milk, as it lends great flavor and is a bit healthier.  This slaw is best consumed the day it is made.

1 1/2 teaspoons chili-garlic sauce

6 Tablespoons coconut milk

2 Tablespoons sugar

1 Tablespoon soy sauce

1/2 teaspoon toasted sesame oil

1/2 teaspoon ground ginger

2 Tablespoons lime juice

8 cups finely sliced Napa cabbage

4 ounces snow peas, washed, strings removed, and sliced into very thin strips

6 radishes, thinly sliced

1 cup cilantro leaves, roughly chopped

1/2 cup blanched, slivered almonds, toasted

Combine first 7 ingredients in a large mixing bowl and whisk until completely combined.

Add all of the vegetable and almonds and toss until thoroughly combined.  Refrigerate until well-chilled.  Serve.  (Best eaten the day it is made!)


Dark Chocolate & Sour Cherry Eve's Bars

Dark Chocolate & Sour Cherry Eve's Bars

Dark Chocolate & Sour Cherry Eve's Bars

"Eve's Bars" were my adaptation of the bar cookie that became popular during my childhood, Seven Layer Cookies.  On a visit to Jekyll Island, GA, I tried a very similar cookie at the cafe in the Grand Hotel, that had a chocolate rather than graham cracker crust. The light came on; there were lots of flavor profiles to use making these bars!  I make several versions of this cookie, but this is my favorite for Christmas. The dark chocolate and dried sour cherries give this humble cookie a little sophistication, and the almonds add the perfect crunch. Look for more versions in the months to come!

Equipment needed:           9 X 13 Baking Pan    Parchment paper   

Small binder clips

Non-stick cooking spray

2 ounces (4 Tablespoons) unsalted butter, melted

3/4 cup finely crushed Oreo cookie crumbs

1 can sweetened condensed milk

1 1/2 cups dark chocolate chips

3/4 cup white chocolate chips

1 1/2 cups dried sour cherries

1 1/2 cups sliced or slivered almonds

Preheat the oven to 350-degrees

Spray a 9 X 13-inch baking pan with non-stick spray; be generous, as these will stick to the pan if it isn't well greased.

Cut two pieces of parchment paper: one the width of the longer side of the pan with enough extra to hang over the ends of the pan by a couple of inches, and one the width of the shorter side of the pan, also with some overhang.  Place one piece in the pan and secure the edges with the binder clips, then lay the second piece over that, also securing with binder clips.  Spray everything well with non-stick spray.

Combine the Oreo crumbs with the melted butter and mix well.  Sprinkle over the bottom of the pan, the level and press the crumbs in firmly using a 1/2 cup stainless measuring cup with a flat bottom.

Drizzle the sweetened condensed milk over the crust, making sure to cover every bit of the crust; take your time and drizzle it slowly, as it is too difficult to spread with a spatula.

Sprinkle the chocolate chips evenly over the pan then the white chocolate chips, cherries, and finally, the almonds.  Press down lightly to nestle everything together firmly.

Bake for about 25 minutes, checking after 20, until the center is bubbly.  Place the pan on a cooling rack and cool completely.

Remove the clips, and run a table knife around the side of the pan, under the parchment paper.  Lift the cookies out of the pan in one piece, using the overhanging parchment paper.

Using a long chef's knife, cut into 24 bars (cut the 13" side into 6, and the 9" side into 4).  Wipe the knife with a damp towel between cuts.

Store in an airtight container with waxed paper or parchment between layers.  These cookies freeze well, be sure to cover all of the surfaces with plastic wrap and freeze in an airtight container to avoid freezer burn.

Chocolate Ice Cream Cake Roll

Chocolate Ice Cream Cake Roll with Black Cherry Ice Cream

Years ago I took orders for these during the holidays; I've made more than I can remember!  They are simple to make, though they get prettier the more you practice.  The cake bakes in no time, and once it cools, simply needs to be filled with your favorite ice cream and frozen.  Make this up to two weeks ahead of time, and once it is frozen solid, wrap it tightly in plastic wrap.  It's great to have a couple of these in the freezer for last-minute guests or gifts. I like "pink" ice cream during the holidays; peppermint, black cherry, raspberry or strawberry, but vanilla, chocolate or salted caramel are awesome, too.  Use your imagination! And a little drizzle of Chocolate Sauce is the perfect finishing touch!

Equipment needed:   Fine-mesh strainer   Half sheet pan   Mixer     Offset Spatula

For the cake:

4 egg yolks

1/4 cup sugar

1/2 teaspoon vanilla

4 egg whites

1/2 cup sugar

1/2 cup cake flour

1/4 cup cocoa powder

1 teaspoon baking powder

1/4 teaspoon salt

Grease a half-sheet pan and line the bottom with parchment paper.  Preheat the oven to 375-degrees.

Place the egg yolks into the bowl of the stand mixer (or a large bowl and use a hand mixer) and beat until thick and lemon-colored; gradually beat in the 1/4 cup sugar; add vanilla. 

(Transfer the mixture to another bowl if using a stand mixer.  Clean the mixer bowl well with hot water and soap, rinse, and dry thoroughly.  Use a clean, large bowl to beat the egg whites in, and thoroughly wash and dry the beaters if using a hand mixer, also.  Egg whites need to be whipped in a totally fat-free bowl with a squeaky-clean beater attachment.)

Place the egg whites into the mixing bowl and beat until soft peaks form; with the mixer running, gradually add the 1/2 cup sugar and beat until very stiff peaks form, which means they hold their shape when the beater is lifted up out of the bowl and turned upright. 

Fold the egg yolk mixture into the egg whites gently, deflating the whites as little as possible.

Combine the dry ingredients and sift through a fine-mesh strainer over the egg mixture.  Fold in gently until no streaks of the dry ingredients are visible.

Drop spoonfuls of the batter evenly over the parchment in the pan, then gently level with an offset spatula.

Bake in the preheated oven for 8-10 minutes, or until it springs back when pressed lightly in the center.

While the cake bakes, lay out a clean large woven (not terry) dish towel and dust liberally all over with confectioners sugar.

When the cake is done, run a knife all the way around the outside of the pan, then turn the cake out onto the prepared dish towel.  Remove the parchment paper.  Starting at the short end, roll the cake and towel together into a roll.  Place the cake on a cooling rack and let cool completely inside the towel.

To Assemble:

2 quarts ice cream of choice, softened slightly(black cherry was used in the picture, but peppermint, vanilla, caramel, or chocolate work well, too)

On a work surface gently unroll the cake, leaving it on the towel.

Beat the ice cream with a mixer just until uniformly smooth and spreadable, but still very frozen.

Quickly spread the ice cream evenly over the cake with an offset spatula.  Re-roll the cake, using the towel to help roll it, removing it as the cake is rolled up. Gently coax the cake into a log shape if it is at all lopsided, being careful not to crack the cake.

Place on a baking sheet, cover loosely with plastic wrap and place in the freezer for at least 4 hours, or until frozen solid.  The cake can be served at this point, or wrapped tightly in plastic wrap, and frozen for later use.