Brunch Ham or Smoked Salmon & Asparagus Strata

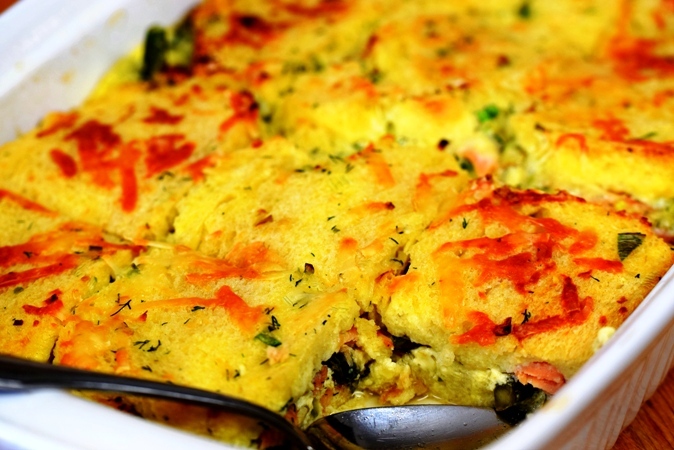
This is a most versatile and delicious breakfast, brunch, or lunch dish!  Make it with Ham & Cheddar, or, if you're not a fan of ham, make it with Smoked Salmon & a Swiss-style cheese.  Make it the night before and bake before your guests arrive for easy entertaining.  You'll impress with this dish, and it couldn't be easier!

1 1/2 Pounds Asparagus, cut into 2" pieces

3 Tablespoons Butter, softened

16 Ounces Sliced Bread,(a firm sourdough or sturdy white loaf) crusts removed

3/4 Cup Shredded Cheddar (for ham strata) OR Swiss-style Cheese (Emmenthal, Gruyere, Grand Cru) for Salmon strata, divided

2 Cups Fully Cooked Cubed Ham, OR 8 ounces sliced Smoked Salmon                           

6 large Eggs

3 Cups Whole Milk

2 Tablespoons minced green onions

1 teaspoon finely minced fresh dill (omit if using ham!)

1 teaspoon Kosher salt

1/4 teaspoon dry mustard

Cook asparagus until just tender.  Drain.

Lightly butter bread slices.  Place half of slices in a greased 13X9-inch baking dish.  Sprinkle with 1/2 cup cheese.  Layer with asparagus and ham.  Cover with remaining bread, buttered side up.  In a blender, combine the eggs, milk, salt and mustard.  Add the onion and dill (if using) and pulse to combine; pour over bread.  Press gently to help bread soak up milk.  Allow to sit at least 10 minutes.  (Strata can be refrigerated at this point and baked up to 8 hours later.)

Bakes, uncovered at 325-degrees for 50 minutes.  Sprinkle with the remaining cheese.  Return to the oven for 10 minutes or until cheese is melted and a knife inserted near the center comes out clean.  Serve immediately.  Refrigerate leftovers.  Keeps about 3 days in the refrigerator.

Feast's Asian-Style Tuna Salad

Feast's Asian-Style Tuna Salad served as a sandwich with toasted whole-grain bread and thinly-sliced cucumbers.

Feast's Asian-Style Tuna Salad served as a sandwich with toasted whole-grain bread and thinly-sliced cucumbers.

This tuna salad is the result of wanting the flavors I love in sushi and Japanese dishes in an everyday tuna salad.  It was a favorite year-around at the cafe, especially during Lent and the hot summer months!  It makes a fabulous sandwich, but is equally wonderful served on a bed of lettuce garnished with cucumbers and a few radish slices for color.  Either way, it is addictive!

2/3 cup mayonnaise

2 Tablespoons pickled ginger, very finely minced

1 /2 teaspoon ground ginger

3/4 teaspoon sesame oil

1 Tablespoons wasabi powder

1 Tablespoon chili-garlic sauce

2 tablespoons seasoned rice vinegar

2 Tablespoons sweet chili sauce

1 Tablespoon soy sauce

4 whole green onions, thinly sliced

1/2 cup finely-diced celery

1/2 cup finely-diced daikon radish

2-9 ounce cans of tuna, well-drained

Combine mayonnaise, pickled ginger, ground ginger, sesame, oil, wasabi powder, chili-garlic sauce, seasoned riced vinegar, sweet chili sauce, and soy sauce thoroughly in a medium bowl. Taste and adjust to suite your taste.  Add the green onions, celery, radish, and tuna and combine well.  Refrigerate for one hour before serving to allow the flavors to marry.

Serve on toasted bread with cucumber slices or on a bed of lettuce with cukes and radishes.

Crostini

Crisp Crostini ready for accessorizing!

Crisp Crostini ready for accessorizing!

Thin, crisp little toasts are the perfect base for so many things!  Dips, appetizers, mini-open-faced sandwiches, with soup, crostini are easy and versatile. Slice and freeze leftover baguette for making crostini later. Here are the instructions for perfect crostini, every time.

Day old or stale Baguette, any type, cut into 1/4" thick slices (cutting on the bias, or at an angle, will create a wider crostini with more surface area, if a larger size is needed)

Olive oil spray (purchased or in a kitchen oil sprayer)

Kosher salt

Preheat the oven to 400-degrees.  Lay the bread slices out on a sheet pan (or 2 or3).  Spray lightly with the olive oil and sprinkle liberally with salt.  Flip all of the slices over and repeat on the other side.

Place in the preheated oven and bake for 10 minutes.  Flip the bread over and continue to bake until light golden brown all over. (Time will vary depending on the type of bread, and degree of freshness.)  Remove from the oven and cool on the sheet pans.  Store in an airtight container if not using immediately.

Spicy Tuscan Bean Dip with Crostini

Spicy Tuscan Bean Dip with Crostini

Spicy Tuscan Bean Dip with Crostini

A creamy pop of flavor is a great way to start the dinner hour!  This dip does not disappoint and is perfect served on crostini or crackers with a glass of wine, with a platter of crudités, or even spread on a tortilla or pita and stuffed with veggies for a quick wrap or sandwich.  You will want this in your refrigerator often as an appetizer, snack, or sandwich component!

4 cloves of garlic, coarsely chopped

1 1/2 Tablespoons fresh rosemary leaves, coarsely chopped

1/4 cup olive oil

1/2 teaspoon crushed red pepper

1-15ounce can cannelini beans, rinsed and well drained

1/2 teaspoon salt

Water, if needed, to thin

Crostini

Combine the garlic, rosemary, olive oil, and crushed red pepper in a saucepan or skillet.  Heat over low heat for about 10 minutes, or until the garlic is translucent and rosemary is very soft.  Do not allow to boil as garlic will become bitter, keep below a simmer.

Place beans in a food processor and then add olive oil mixture.  Process until very smooth, with no large bits of rosemary.  Specks of pepper and rosemary will be visible, but there should not be any large pieces.

Season to taste with salt.

Serve with crostini.

Spring Peas with Cream & Mint

3 cups fresh or 1 pound frozen sweet peas, thawed

2 Tablespoons sugar

1/2 cup heavy cream

2 Tablespoons unsalted butter

1 Tablespoon finely chopped mint (use chervil or chives if you don't like mint)

If using fresh peas: Bring a large saucepan of salted water to a rolling boil, then slowly add the peas, keeping the water boiling.  Stir in the sugar and cook the peas, uncovered for about 5 minutes, until tender.  For frozen peas: Prepare as above, reducing the cooking time to 1-2 minute, or just until heated through.

Drain peas in a colander.

Boil the cream in a saucepan until reduced by half, 3-5 minutes.  Add the butter, peas, 1/4 teaspoon pepper and salt to taste and cook over medium heat, stirring, until butter is melted and the peas are heated through.  Stir in the herb of choice.

"Oh-So Coconut" Cheesecake

Oh-So Coconut Cheesecake

Oh-So Coconut Cheesecake

Creamy Coconut Cheesecake was a best-seller at the cafe and Farmers Markets.  I've updated the recipe and it is even better!  The addition of "Coco Lopez" (or another brand of sweetened condensed coconut milk) was inspired when I tried it in coconut frosting, and it works beautifully!  Coconut is added to each element of this dessert, yet is never overpowering or cloying.  This is a wonderful springtime, or anytime, cheesecake!

5 1/2 ounce of coconut wafer cookies (I like the Mexican-style wafer, sold in the Mexican or International section of the supermarket.)

2 Tablespoons sugar

2 1/2 ounces (5 Tablespoons) unsalted butter, melted

2 pounds cream cheese

1/2 cup sugar

1/2 cup Coco Lopez (or other brand of sweetened, condensed coconut milk)

1 teaspoon coconut extract

1/4 teaspoon vanilla extract

4 large eggs

1/2 cup sweetened, shredded coconut

Whipped Cream That Won't Fall Flat, 1 recipe

1 cup toasted, shredded coconut

Preheat the oven to 425-degrees.

Butter a 9-inch cheesecake pan.  Cut a circle of parchment paper to fit the bottom of the pan, place it in the bottom of the pan, then butter the parchment.  Set aside.

Prepare the crust:

Place the cookies and sugar in the bowl of a food processor and process until fine crumbs form.  Add the butter and pulse until well-combined.  Dump the crust mixture into the prepared pan and level, then press and level with a stainless measuring cup until firm and level.  Set aside.

Prepare the batter:

Place the cream cheese in the bowl of a stand mixer or mixing bowl and beat until light, fluffy, and lump-free.  Add the sugar, coco loco, and extract and beat until completely combined, scraping down the sides of the bowl several times.  Add the eggs, one at a time, beating well after each addition, until thoroughly combined, scraping down the sides and bottom of the bowl to be certain the mixture is completely combined, then gently mix in the 1 cup of coconut.

Pour into the prepared crust and level batter.  Bake in the preheated oven for 10 minutes, then lower the heat to 325-degrees.  Bake for an additional 30-40 minutes, or until the cheesecake is set with just a small amount of jiggle in the very center.

Remove from the oven and place on a cooling rack; cool to room temperature.  Cover with plastic wrap and refrigerate for at least 4 hours, or overnight.

Remove cheesecake from the refrigerator.  Remove from the pan and place on a cake board then onto a serving platter or freezer container, removing the parchment from the bottom.  Pipe or spread the whipped cream over the top of the cheesecake, then sprinkle with the toasted coconut. 

If serving immediately, cut into 12-16 slices, wiping the knife between cuts with a wet towel.  The cheesecake can be frozen at this point to serve later.  (If freezing, wait to slice it until you take it out to defrost, it will cut beautifully, just use a chef's knife to cut the frozen cheesecake. Defrost in the refrigerator overnight.)  Keep cheesecake refrigerated.  It will keep about 3 days in the refrigerator, freeze any leftovers.