Here's the July '17 Edition!

Happy July!

The glorious, delicious, much-longed for days of summer are in full-bloom, and it is "amaze-balls"!  I can't think of a better way to say it, so slang it is.  The harvests have started, and there is so much fresh, fabulous food available for consuming and preserving.  If only we could preserve a bit of this weather to open up come January!

The July '17 Edition is live, and you will find plenty of dishes to enhance summer dining at your table.  There are also Preview recipes to enjoy, with a new recipe coming every week.  Your cookbooks are surely getting fat by now, and I'm delighted about that!  Here's a quick look at the recipes you'll find this month.

Start the day with Baked (Shirred) Eggs with Fresh Herbs & Parmesan, some toast, and a bit of fruit; you'll sail through the morning with a smile on your face!  This is one of my favorite egg preparations, one you'll definitely want in your breakfast and brunch repertoire. 

For lunch, or as a hearty side salad, indulge in Shrimp & Pasta Salad with Creamy Avocado Dressing.  Shell pasta catches the corn, scallions, tomatoes and creamy avocado dressing, and acts as the perfect bed for tender shrimp.  Oh my!  And you must try my Chilled Sweet Potato Soup with Spicy Crema and Toasted Pepitas.  It is the silkiest, creamiest soup you'll ever put on your tongue, and is absolutely satisfying. The swirl of slightly spicy crema perfectly complements the sweetness of the potatoes, and the pepitas add an interesting texture, so this soup is always interesting.  And even better, come chilly weather, it is just as good served hot! 

If you're thinking a taco might be just the warm weather food you need, then My Favorite Fish Tacos deserve a try.  Flaky fish, mango and cabbage slaw in a warm tortilla with a drizzle of avocado crema will make you a fan of this food I learned to love in California.

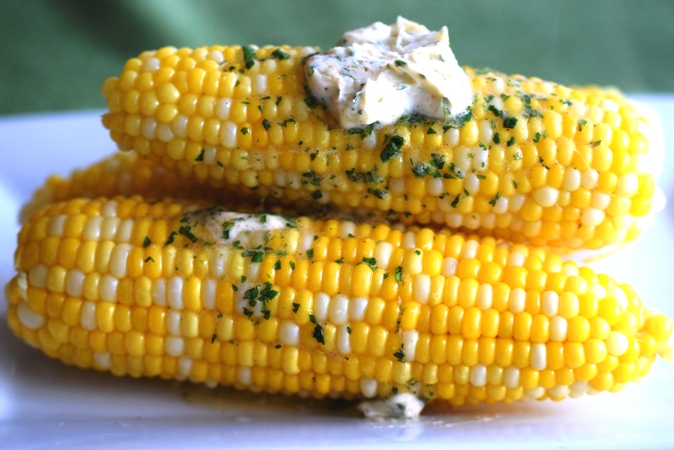
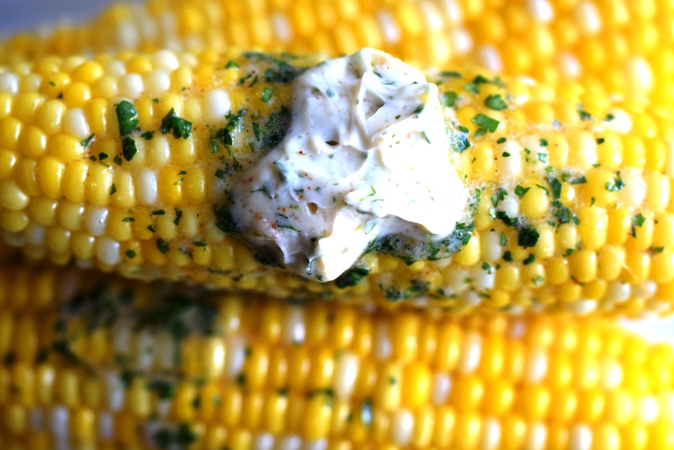
Before dinner nibbles are necessary for summer entertaining, and Cool Crab & Scallop Ceviche was always a catering all-star!  Try it once and you'll be addicted.  And as entrees go, there's just nothing much better than a Grilled Rib Eye Steak that has been languishing in my version of Chef Rick Tramonto's steak marinade. Serve Corn on the Cob with Compound Butter with that steak and your guests will know you're a rock star in the kitchen!

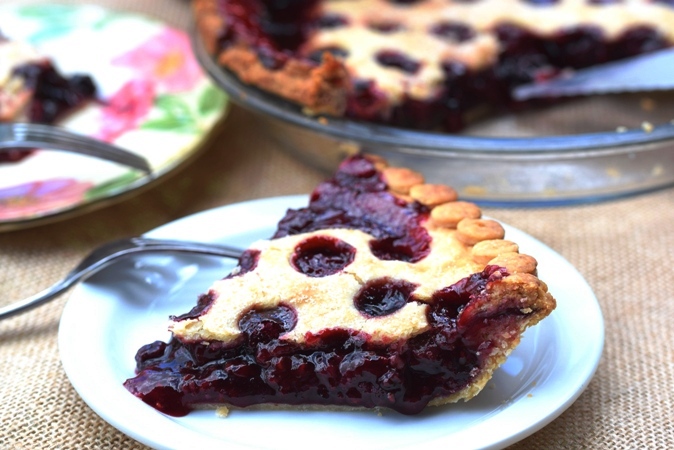
Sweet treats and summer go hand in hand, and I haven't forgotten them!  S'mores Roll-Ups are something I came up with after seeing a recipe for something similar using marshmallow creme.  S'mores have to have toasty marshmallow flavor, so I created this version, complete with real toasted marshmallows!  The abundance of fresh berries in the summer definitely causes pie cravings, so grab some berries and make my Berry Explosion Pie, it will satisfy your berry and pie cravings, and if you add a scoop of ice cream, you'll be in pie heaven.

These recipes should keep you really busy trying new summer dishes; I hope you'll work them all in before the next issue arrives in August!

Now please go soak up every ounce of the magnificence of this season, cook some primo food, and know that I'm thankful for each of you that are cooking through the seasons with me.  July is going to be "amaze balls"!


Baked (Shirred) Eggs with Fresh Herbs & Parmesan

Baked Eggs with Fresh Herbs & Parmesan

Baked Eggs with Fresh Herbs & Parmesan

There are several methods and names for this dish.  One is to put the herb-and-cheese topped eggs under a broiler and cook.  I prefer to bake them for a few minutes, then run them under the broiler just long enough to brown the cheese slightly.  And when you taste them, you'll understand why this is my favorite egg preparation!  Use fresh herbs, as dried herbs just won't do here.  Some crisp toast for dipping and a side of your favorite fruit are all you need for a breakfast fit for YOU!  Cooking time will vary a bit depending on the serving vessel and how soft you like your eggs.  I used an 8-ounce ramekin,which was the perfect size.  Be sure the dishes are oven and broiler safe.  Serves 4

8 large eggs, at room temperature

4 teaspoons butter

4 teaspoons heavy cream

1 Tablespoon very-finely minced fresh herbs, using a mixture of 3 (thyme, chives, parsley, oregano, basil, marjoram, etc. Use your favorites!)

1/4 cup finely shredded Parmesan or Asiago cheese

1/4 teaspoon salt

1/8 teaspoon freshly-ground black pepper

Preheat the oven to 400-degrees.

Combine the herbs, Parmesan, salt and pepper in a small bowl and stir until very well combined.

Spray 4 oven- and broiler-proof ramekins with non-stick spray.  Place 1 teaspoon each butter and heavy cream in each ramekin.  Place on a small baking sheet and place in the oven until the cream is bubbly and the butter is melted, about 4-5 minutes.  Use your eyes rather than the timer!

While the ramekins are in the oven, crack two eggs into each of 4 small bowls.  Remove the ramekins from the oven and quickly slide 2 eggs into each one.  Sprinkle a heaping tablespoon of the herb-cheese mixture over the eggs.  Return to the oven for 3-4 minutes, until the whites just start to firm up around the edges.  Remove from the oven and switch on the broiler.  Slide the pan with the ramekins under the broiler and broil until the cheese is melted and browned.  The eggs will continue to cook after they are removed from the broiler, so yolks need to be really soft when removed from the heat.

Serve immediately with toast on the side.

Shrimp & Pasta Salad with Creamy Avocado Dressing

Shrimp & Pasta Salad dressed with Creamy Avocado Dressing

Shrimp & Pasta Salad dressed with Creamy Avocado Dressing

When the weather is hot there is nothing better than a cool, creamy, yet substantial salad for a hearty lunch or light supper.  Shrimp Pasta Salad with Creamy Avocado Dressing has it all going on, and is a meal in a bowl!  It also works as a side dish, just use smaller shrimp or cut the larger ones into thirds and mix them into the salad-perfect!  (If you're not a seafood fan, use cubes of chicken and cook them with chicken stock rather than fish stock and proceed with the recipe!)  The shell pasta cups the dressing, tomatoes, corn, and green onions, and each bite is a flavor bomb.  The avocado dressing is bright, surprisingly light, and has just a hint of heat.  This is a house favorite-try it at your house; it will be a summertime staple!  4 entree servings, or 6-8 side servings

1 pound pasta shells, cooked and drained

1 Tablespoon extra-virgin olive oil

1/2 cup fish or seafood stock (I keep jars of Better than Broth in several varieties in the refrigerator, including fish, so I can mix up the exact amount that I need for a recipe; it works great!)

1 pound raw shrimp, peeled and deveined, 20-24 count per pound (I like Tiger shrimp with the tails on for an entree salad) If making this as a side salad or for a group, use smaller shrimp.

1 cup fresh or frozen corn, cooked but still crisp

1 cup ripe, seeded, chopped Roma tomatoes (make sure the seeds and liquid are squeezed out)

5 scallions, thinly-sliced on the bias

1/4 cup chopped fresh cilantro, plus more for garnish

1 large avocado, peel and seed removed

1 1/2 Tablespoons white wine vinegar

2 1/2 Tablespoons fresh lime juice

2 Tablespoons water

1/4 cup plain yogurt

1/4 teaspoon dried chipotle pepper powder

2 Tablespoons extra-virgin olive oil

1 teaspoon salt

After the pasta is cooked and drained, return it to the pot and toss with the 1 Tablespoon olive oil.  Spread it out on a sheet pan and refrigerate until completely cold, at least an hour.

In a medium frying pan over high heat, bring the fish stock to a boil.  Add the shrimp, reduce the heat to low, cover and simmer for 1 minutes, stir, re-cover and cook until the shrimp are just pink and curled, don't overcook. Remove to a plate with a slotted spoon and set aside to cool, then cover and refrigerate until ready to serve. (If you are making this as a side salad, and are using the large shrimp, cut them into thirds or quarters and refrigerator.)

Bring the shrimp cooking liquid in the skillet back to a boil and cook until the liquid is reduced to 2 Tablespoons.  Remove from the heat and set aside.

In a large bowl combine the pasta, corn, tomatoes, scallions, cilantro, and shrimp(if you are making a side salad).  Set aside.

In a blender combine the avocado, white wine vinegar, lime juice, reserved cooking liquid, water, yogurt, chipotle pepper powder, and salt.  Process until smooth.  With the motor running, stream in the olive oil until well combined.

Toss the dressing with the pasta mixture until well coated.  For entree salads, place in individual salad bowls lined with lettuce and top with the reserved shrimp.  Garnish with additional cilantro and sliced scallions. 

To serve to a group or as a side, mix in the reserved shrimp and place in a large bowl lined with lettuce leaves and garnish the top with sliced scallions and cilantro leaves. 

Refrigerate until ready to serve, and keep any leftovers refrigerated.  Use within 2 days.

Chilled (or Hot) Sweet Potato Soup with Spicy Crema & Pepitas

Chilled Sweet Potato Soup with Spicy Crema & Pepitas

Chilled Sweet Potato Soup with Spicy Crema & Pepitas

This soup is a beauty, and wins big points for versatility!  I adore this soup chilled in the summer; it is smooth, creamy, earthy and cool.  The crema provides random pockets of mild heat, and the Pepita's salty crunch punctuates it's velvety lusciousness.  It's an awesome first course or lunch main dish, and when cold weather returns, it is equally amazing as a hot soup!  This is a recipe for all seasons, and a must-make.  A lovely side benefit are the basic, healthy ingredients in the recipe. I discovered this unique cooking technique for sweet potatoes last year; don't deviate from it!  It's soaking the sweet potatoes and skins in the hot liquid that creates the silky texture in the finished product. Serves 4 as a main course or 6 as a first course.

4 Tablespoons unsalted butter

1 shallot, thinly sliced

4 sprigs fresh thyme

1/2 teaspoon dried coriander

4 1/4 cups water

2 pounds sweet potatoes, peeled, halved lengthwise, and sliced 1/4-inch thick, plus reserved 1/4 of the peels

1 Tablespoon packed brown sugar

1/2 teaspoon cider vinegar

Salt & Pepper

*Sweet & Spicy Crema (can be prepared while potatoes and skins stand in the water)

1/2 cup Greek yogurt

1 tablespoon fresh lime juice

1/8 teaspoon cayenne pepper

1/8 teaspoon chipotle pepper powder

pinch of salt

2 teaspoons maple syrup

2 tablespoons half-and-half or whole milk

Roasted, salted pepitas for garnish

Melt the butter in a large saucepan over medium-low heat.  Add the shallot, thyme, and coriander and cook until the shallots are soft but not browned, about 5 minutes.  Add the water, increase the heat to high, and bring to a boil.  Remove the pot from the heat, add the sweet potatoes and reserved peels, and let stand for 20 minutes. (This is a good time to make the crema, especially if the soup will be served hot.)

Add the brown sugar, vinegar, 1 1/2 teaspoons salt, and 1/4 teaspoon black pepper to the potatoes and skins.  Bring to a simmer over high heat.  Reduce heat to medium-low, cover, and cook until the potatoes are very soft, 10-15 minutes.

For Chilled Soup:  While the potatoes finish cooking, prepare an ice bath in the sink or in a dish pan.  Remove the potatoes from the heat and pour into a large stainless bowl.  Place the bowl in the ice bath.  Stir occasionally until the mixture is cool.  Remove, dry the bowl, cover, and refrigerate until very cold.  Once chilled, process in batches in the blender until totally smooth.  Serve immediately or refrigerate until ready to serve.

For Hot Soup: When the potatoes are soft, use an immersion blender to blend the potato mixture in the pan until silky smooth.  Serve immediately.  Store cooled leftovers in the refrigerator for up to 3 days.

*To make the Crema:  Whisk all together in a bowl until thoroughly combined.  Place in a squeeze bottle and refrigerate until ready to serve.  Alternately, place in a bowl with a lid and refrigerate; use a spoon to swirl it over the soup instead of squeezing it out of a bottle. 

To Serve (either version):  Place soup in serving bowl.  Swirl the crema (about 2 Tablespoons) over the top of the soup, then sprinkle with the pepitas.

My Favorite Fish Tacos

Fish Tacos with Mango Slaw

Fish Tacos with Mango Slaw

My first experience eating fish tacos was at a little restaurant called Rosy's at the Beach in Morgan Hill, California back in 1999. (They are still in operation, and the tacos were voted #1 by the San Jose Mercury News in 2016!) Being a Midwesterner, fish tacos didn't sound particularly appetizing, but one bite and I was "hooked"!  This is my version of fish tacos.  The tacos at Rosy's were made with corn tortillas, with a choice of grilled salmon, prawns, or ahi tuna, cabbage slaw, avocado, and salsa.  My version is made with flour or corn tortillas, seasoned broiled white fish (because it is readily available and affordable, but you could use any firm fish you like), a cabbage and mango slaw, and an avocado-lime crema, topped with cilantro and a little jalapeno if you want more heat. If you've never dared try one, make these.  I think this recipe will "reel you in".  Serves 4

For the fish:

1 pound of fish of your choice such as cod, pollock, etc. (You could also use ahi tuna, salmon or shrimp)

1/4 cup olive oil

2 canned chipotle peppers

1/2 teaspoon ancho chili powder

1 Tablespoon lime juice

1/2 teaspoon salt

1 jalapeno pepper, finely minced

1/4 cup cilantro leaves, minced

Place the fish in a 1-gallon self-sealing freezer bag.  Place the next 7 ingredients in a small food processor and blend 'til smooth. (Alternately, process with an immersion blender in a liquid measuring cup or in a blender.)  Pour over the fish in a one-gallon freezer bag.  Turn the bag to distribute the marinade over all surfaces of the fish.  Refrigerate for at least an hour, and up to six hours, turning occasionally.

When it's time to make the tacos, preheat the broiler to high.  Remove the fish from the marinade and shake off excess.  Place the fish on a sheet pan sprayed with non-stick spray.  Place under the broiler and broil until the fish is cooked through and not at all translucent, without turning.  Remove from the broiler and keep warm while assembling the tacos.

Make the slaw:

3 cups shredded cabbage

1 large mango, peeled, and cut into julienne strips

1/2 cup sliced green onions

1 jalapeno pepper, seeded and diced

1/2 cup cilantro leaves, roughly chopped

2 Tablespoons white vinegar

1 Tablespoon olive oil

1 teaspoon honey

1/2 teaspoon salt

Pinch of ancho chili powder

Place the cabbage, mango, onions, and jalapeno in a bowl.  Whisk together the remaining ingredients and pour over the slaw.  Toss to coat everything, cover bowl with plastic wrap or a lid and refrigerate until ready to serve tacos.

Make the Avocado-Lime Crema:

3/4 cup sour cream

1 medium avocado, pitted, flesh scooped out with a spoon

3 Tablespoons freshly-squeezed lime juice

Large pinch of salt

In the jar of a blender or small food processor combine all ingredients and process until smooth.  Store covered with plastic wrap pressed onto the surface of the crema in the refrigerator until ready to serve.

Assemble the Tacos:

8 6-inch flour or corn tortillas,  (I used 8-inch for those pictured above, but smaller is better!)

Heat a medium non-stick skillet over medium-high heat.  Spray lightly with non-stick spray.  Place the tortillas in the skillet, one at a time, and cook on each side until dark brown spots appear.  Stack in a large sheet of aluminum foil and wrap to keep warm while cooking the rest. (You could just warm them in the oven, but they taste raw and don't compliment the rest of the ingredients.  Take the time to grill them!)

Place a portion of fish on a tortilla, top with a generous amount of the slaw, and top with some of the crema.  Garnish with additional cilantro and chopped jalapeno, if desired.

Serve immediately.

Cool Crab & Scallop Ceviche

Cool Crab & Scallop Ceviche

Cool Crab & Scallop Ceviche

Summer entertaining requires a repertoire of refreshing, taste-bud tantalizing appetizers to stimulate palates and appetites that may be dulled by summer's heat.  This appetizer is my favorite for summer!  I started making this as a caterer about a dozen years ago, and it still delights me.  It is bright, light, and crisp, the seafood succulent and satisfying.  There's no cooking, as the scallops are "cooked" with the acid in the lime juice-how easy!  Place the ceviche in a bowl over ice to serve a crowd accompanied by a basket of tortilla chips, or serve it in martini glasses on a plate to hold the tortilla chips for a sit-down dinner.  Either way, you and your guests will savor every last bite!  Serves 6, but can easily be doubled.

1/2 cup very-finely chopped sweet onion, such as Vidalia

3/4 cup freshly-squeezed lime juice

1/2 pound bay scallops, fresh, or thawed frozen

1 1/2 cups Clamato juice

1 cup seeded, diced ripe tomato

2 Tablespoons finely minced jalapeno pepper

2 Tablespoons finely minced cilantro

1 cup chopped avocado

1/2 pound lump crab meat (claw meat if that's all you can find, but not preferred)

6 sprigs cilantro

6 lime wedges

6 ounces tortilla chips

Combine the first 3 ingredients in a medium bowl, cover and chill 2 hours.

Place the Clamato juice in a small saucepan, bring to a boil and reduce to 1/2 cup.  Chill the reduced juice.

Add clamato juice, tomato, jalapeno, and cilantro to the scallop mixture.  Chill for 2 more hours to allow the scallops to finish "cooking".

Fold in the avocado and crab meat.  Garnish with cilantro sprigs and lime wedges.  Serve with the chips on the side.

Grilled Rib Eye Steak with Balsamic Marinade

Grilled Balsamic-Marinated Ribeye

Grilled Balsamic-Marinated Ribeye

A flavorful, juicy grilled steak is just about the best thing for dinner, ever!  Rib Eye steak is a good choice, as it is nicely marbled with fat, and is naturally a tender cut of beef.  This marinade recipe was inspired by Chef Rick Tramonto, who I very much admire; this is my version of his marinade.  Marinating it for just a little while brings out all of that juicy, flavorful, tenderness, and also helps it develop those deep brown grill marks. Serve it up with one of the many salads on the site, and Corn On the Cob with Zesty Compound Butter and get ready for some serious steak love!

4 Rib eye or New York Strip steaks, about 1 1/4-inch thick

For Marinade:

6 Tablespoons white balsamic vinegar

1 teaspoon grated orange zest

2 Tablespoons freshly-squeezed orange juice

1 clove garlic, smashed, then minced

2 Tablespoon finely-minced shallot

1 1/2 teaspoons chopped fresh thyme

1 cup olive oil

Kosher salt & freshly-ground black pepper

In a glass, ceramic, or other nonreactive mixing bowl, stir together the vinegar, orange zest, orange juice, garlic, shallot, and thyme.  Whisk in the olive oil until it comes together.  Season to taste with salt and pepper.

Use immediately, or cover and refrigerate for up to three days.  (Extra marinade may be frozen for later use.)

To prepare steaks:

Place the steaks in a gallon plastic freezer bag and pour enough marinade in to barely cover the steaks.  Squeeze out the air in the bag and seal.  Place in a oblong baking dish or rimmed baking sheet and refrigerate for about an hour, turning every now and then, until the steaks come to room temperature. 

Remove the steaks from the marinade and place on a sheet pan.  (While the steaks are coming up to room temperature, preheat the grill.  Grill should be at a medium heat or about 350-degrees)  Pat the steaks dry.  Sprinkle with just a little salt on each side.

Oil the grill grates.   Place the steaks on the grill.  Close the lid.  Grill for about 5-7 minutes.  Turn and cook on the other side for 5-7minutes, lid closed.  Use an instant read thermometer to accurately cook the steaks to desired doneness.  Rare: 140 degrees: Medium: 155 degrees((I love using my thermometer with a cable so that I can insert it into the side to the center of one of the steaks, set the desired temperature, then place the actual thermometer to the side until the steak registers the desired temperature.  You can do it by feel, if you are confident, but a thermometer is the most accurate way.)

Remove from the grill, cover with foil or a lid, and let rest for 5-10 minutes before serving.

Corn on the Cob with Zesty Compound Butter

I can't think of many foods that are as delicious in season than sweet corn. Freshly pulled from the field or garden, it only needs the silks and husks removed and a bit of light cooking to make it heavenly.  Growing up and for many years after, we froze bushels of it while it was in season, as well as eating it every day during corn season, which could last quite a while.  As delectable as it it, a little variety is always welcome. Compound butter is something I have been using for lots of different dishes, and it is a fabulous way to give an already amazing bite a flavor bump. Compound butter is easy to make; this is my favorite version to serve with sweet corn, which is a perfect side for grilled entrees, from hamburgers to barbecue chicken, and everything in between. Give it a try, I think you'll love it! Makes enough for 10-12 ears of corn

4 ounces (1 stick, 1/2 cup) butter, very soft, but not melted

1/2 teaspoon fine lime zest

1 teaspoon very finely minced cilantro

Pinch of dried ground chipotle pepper

Salt, to taste

In a small bowl stir the butter with a rubber spatula.  Add the zest, cilantro, chipotle pepper powder, and a pinch of salt.  Work the ingredients into the butter until they are evenly distributed.  Taste, and add more salt (and chipotle pepper), if needed.  The butter needs to be a bit "salt and pepper forward", as the butter provides the seasoning for the corn, so don't be too restrained with the salt and pepper.  Remember, too, that the flavors in the butter will be diluted once it has melted onto the corn, so if it tastes "strong", that is a good thing!

Once the butter is to your liking, take a square of plastic wrap and lay it out on the counter.  Drop the butter by spoonfuls in a 6-inch row over to one side of the wrap.  Gently roll the plastic wrap around the butter to form a cylinder.  Pick up the plastic wrap by the ends and twirl, tightening the cylinder of butter.  Lay the plastic down and roll the cylinder of butter a bit to even it out.  Tum under then ends of the wrap and place the butter in the freezer to harden.

When ready to serve, remove the butter from the freezer and slick into 10-12 pieces.  Place them on a small, chilled plate and serve alongside the corn.  Alternately, place slices of the butter on the ears as they are stacked on a platter and scatter additional chopped cilantro over the corn for a pretty presentation.  (This is beautiful, but the individual servings are easier for diners to use.)

S'mores Roll-Ups

S'mores Roll-Ups

S'mores Roll-Ups

I actually saw this recipe on Pinterest and after reading through it decided it needed an upgrade.  The recipe called for marshmallow creme, but I knew I wouldn't get the smoky flavor of real toasted marshmallows.  I decided to find a way to make it that would capture that toasty flavor using either a kitchen torch or the oven broiler, and this is the result!  I will warn you, these treats are extremely addictive, and they are now a tradition at our annual family reunion!  This recipe is a must-try, especially if you have children or grandchildren that you want to delight!  Makes about 16 servings

10 ounces miniature marshmallows

2 ounces (1/2 stick butter) plus more for greasing the pan

5 cups crispy rice cereal

3/4 cup graham cracker crumbs

10 ounces miniature marshmallow

12 ounces milk chocolate, melted

Grease a 10 X 15-inch jelly roll pan, then line with waxed paper or parchment paper.  Butter the paper and set aside.  Have a kitchen torch at the ready.  If not using a torch, preheat the oven broiler.

Place 10 ounces miniature marshmallow and butter in a very large glass bowl. Cover the bowl and microwave in 30-second intervals until melted.  Stir in the rice cereal and the graham cracker crumbs and combine well.  Press evenly into the prepared pan.

Spread the remaining 10 ounces of miniature marshmallows over the cereal mixture in the pan.  If using a torch, light and run over the marshmallow until a very dark golden brown all over.  Alternately, run the pan under the broiler, about 6 inches from the element, and broil, turning as necessary to insure even browning.  Broil until a very deep brown (a little blackened if you like your marshmallows that way!).

Quickly drizzle the melted chocolate evenly over the marshmallows, then use an offset spatula to smooth out the chocolate over the marshmallows.  Let it set for about 5 minutes.

Starting at one of the long edges, roll up the whole thing, using the wax/parchment paper to help roll, separating it from the cereal mixture while rolling.  Place the log on a large piece of plastic wrap that has been sprayed with non-stick spray.  Roll the log up in the plastic, then twist the ends together.  Roll the log to shape into an even cylinder shape, and place on a sheet pan, seam side down.  Refrigerate for at least 3 hours.  Once chilled, remove from the plastic and cut into approximately 16 1/2-inch slices.  Store in an air-tight container.  May be frozen, too.

Berry Explosion Pie

Berry Explosion Pie

Berry Explosion Pie

Okay, I admit, berry pies are my favorite!  Fresh-picked berries are in my Top 5 foods, for sure.  This pie uses a combination of berries, either fresh or frozen, each kind lending its own goodness to the finished pie.  The tapioca flour used to thicken the filling results in a clear, not cloudy, filling.  Best of all, this pie can be made year-around, using frozen mixed berries. It would be great if the pie didn't boil over, but to do that the amount of filling would have to be mighty small.  If I have to choose between a good looking pie and a good eating pie, I'll choose the latter every time.  This pie is both, if you can overlook the "over-flow". Mmmmmmm.......bring on the ice cream!

5 cups fresh or thawed, frozen mixed berries such as blueberries, blackberries, raspberries, strawberries (If using frozen berries, measure them before they thaw!)

1 cup + 2 Tablespoons sugar

5 Tablespoons tapioca flour (available in the gluten-free or section of supermarket featuring all kinds of flours and grains)

1 teaspoon freshly-grated lemon zest

Big pinch of salt

1 recipe Basic Pie Crust, chilled, then allowed to warm up a bit

2 Tablespoons butter

Milk (for brushing over the top)

Sugar (for sprinkling over the top)

Preheat the oven to 400-degrees.

Place the berries in a very large glass bowl.  Combine the sugar, tapioca flour, lemon zest, and salt in a small bowl, using fingers to stir, toss, and separate lemon zest so it blends in completely.  Sprinkle the sugar mixture over the berries and toss to thoroughly coat all of the berries with the mixture.  Set aside while preparing the pie crust.

Divide the prepared pie dough into thirds. (One recipeof the Basic Pie Crust makes enough for 3 single crusts-wrap one third in plastic and refrigerate or freeze for another purpose.)  Roll out one of the remaining thirds into an 11-inch circle.  Wrap around the rolling pin and lay over a 9-inch pie plate (preferably glass).  Center the dough gently, ease into the pan and smooth to fit.  Roll out the remaining dough into an 11-inch circle.  Cut slits, or use a small round cutter to create the top crust pictured, leaving a 2-inch border that doesn't have circles cut out. 

Pour the pie filling into the prepared bottom crust.  Dot all over with the butter.  Carefully roll the top crust around the rolling pin, then roll out on top of the pie.  Brush with milk (if you're making the "polka dot crust" you may not be able to brush with milk, so skip it) and sprinkle with enough sugar to give it a sparkly appearance.  Crimp the edges if you're just cutting slits in the top, or if you cut out the circles of dough simply fold the edge under and press down with the tines of a fork to emphasize the dots.  For a different look, fold under the edge of the crust and gently press, then brush with milk and place the pie crust circles around the edge of the crust, as shown above.

Bake in preheated oven until the pie filling boils up in the center, 50-60 minutes, or more.  Use your eyes and nose to determine doneness; the pie is not done until it boils up in the center!  If the crust browns too quickly, cover with aluminum foil, removing the foil a few minutes before taking the pie out of the oven. (If the pie is removed before it boils in the middle, the filling will not have cooked through, resulting in cloudy, runny pie filling.  Be patient and cook it all the way through, tenting with foil as needed!)

Place on a rack and cool completely before serving.